How to Create Custom Database Table in Magento 2
I have already posted a video on How To Create A Hello World Module and I believe you can easily create a custom module. You can clone a sample “Hello World” module code from Github. Today, in this blog, I will be diving more inside how to create a custom database table in magento 2.
For complete code of creating custom mysql table in magento, you can download code from Github.
After cloning the code from github, execute these commands in your CLI.
1. To check the status of modules :
|
1 |
php bin/magento module:status |
You can easily see Sagar_CustomTable module is disabled. So, you must enable it.
2. To Enable and Upgrade your module
|
1 2 |
php bin/magento module:enable Sagar_CustomTable php bin/magento setup:upgrade |
The first command enables your module and second command adds your module in module list in config.php inside app/etcfolder.
Before running second command if you load your page, you can see multiple lines of error messages saying something like run setup:upgrade code. Don’t worry. 🙂
You need to run second command that triggers setup scripts of module in database.
Note : If you want to add a extra column we must create UpgradeSchema.php inside app/Setup folder.
If you wish for fresh code yourself, follow these steps :
Step 1 : The module strucute of Sagar_CustomTable is :

Step 2 : Create Configuration file:
Create a file module.xml inside app/code/Sagar/CustomTable/etc folder. This will declare your module with the version of module. Insert this following code inside module.xml
|
1 2 3 4 5 6 |
<?xml version="1.0"?> <config xmlns:xsi="http://www.w3.org/2001/XMLSchema-instance" xsi:noNamespaceSchemaLocation=" ../../../../../lib/internal/Magento/Framework/Module/etc/module.xsd"> <module name="Sagar_CustomTable" setup_version="1.0.0" active="true"> </module> </config> |
Step 3 : Create the installation file :
Create InstallSchema.php file inside app/code/Sagar/CustomTable/Setup folder. This file contains install function that declare and create our custom database table. Inside InstallSchema.php file follow the below code.
|
1 2 3 4 5 6 7 8 9 10 11 12 13 14 15 16 17 18 19 20 21 22 23 24 25 26 27 28 29 30 31 32 33 34 35 36 37 38 39 40 41 42 43 44 45 46 47 48 49 50 51 52 53 54 55 56 57 58 59 60 61 62 63 64 65 66 67 68 69 70 71 72 73 74 75 76 77 78 79 80 81 |
<?php namespace Sagar\CustomTable\Setup; use Magento\Framework\Setup\InstallSchemaInterface; use Magento\Framework\Setup\ModuleContextInterface; use Magento\Framework\Setup\SchemaSetupInterface; use Magento\Framework\DB\Ddl\Table; class InstallSchema implements InstallSchemaInterface { public function install(SchemaSetupInterface $setup, ModuleContextInterface $context) { $installer = $setup; $installer->startSetup(); // Get sagar_customtable table $tableName = $installer->getTable('sagar_customtable'); // Check if the table already exists if ($installer->getConnection()->isTableExists($tableName) != true) { // Create sagar_customtable table $table = $installer->getConnection() ->newTable($tableName) ->addColumn( 'id', Table::TYPE_INTEGER, null, [ 'identity' => true, 'unsigned' => true, 'nullable' => false, 'primary' => true ], 'ID' ) ->addColumn( 'title', Table::TYPE_TEXT, null, ['nullable' => false, 'default' => ''], 'Title' ) ->addColumn( 'summary', Table::TYPE_TEXT, null, ['nullable' => false, 'default' => ''], 'Summary' ) ->addColumn( 'description', Table::TYPE_TEXT, null, ['nullable' => false, 'default' => ''], 'Description' ) ->addColumn( 'created_at', Table::TYPE_DATETIME, null, ['nullable' => false], 'Created At' ) ->addColumn( 'status', Table::TYPE_SMALLINT, null, ['nullable' => false, 'default' => '0'], 'Status' ) ->setComment('News Table') ->setOption('type', 'InnoDB') ->setOption('charset', 'utf8'); $installer->getConnection()->createTable($table); } $installer->endSetup(); } } ?> |
Step 4 : Open the CLI in root folder of your magento installation and run following commands :
|
1 2 |
php bin/magento setup:upgrade php bin/magento cache:flush |
The first command upgrades your setup script to database and second command flushes the magento cache.
Step 5 : You can see the table is created on phpmydmin as :
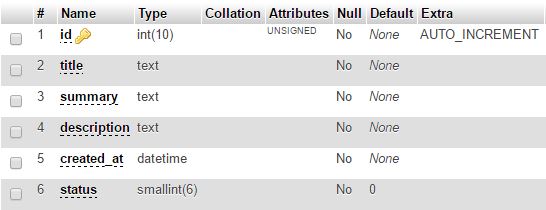
sagar_customtable created on phpmyadmin
Almost, we have successfully created our first custom table sagar_customtable with columns (id, title, summary, description, created_at and status ).
I hope this blog helps you to visualize how custom mysql database table is created on magento 2.
Bookmark the site for your future reference and if you stuck with any problem don’t hesitate to leave a comment below in comment box.
Happy Coding 🙂 🙂
May 26th, 2017
Very Nice tutorial . Thanks 🙂
June 21st, 2017
Wow nice